Introduction
Blogger.com is a popular blogging site that provides not only the storage space and bandwidth for a blog, but also a number of tools that can make a blog more effective. One important blog capability is the ability to automatically display new entries from other blogs. Also called "Really Simple Syndication" or RSS. You can add this capability easily to a Blogger.com blog.
By Subscribing to the site's feed or RSS, any new contents added on that site will be delivered right to your email or to your favorite news readers.
Click on the READ ME link below, to learn How to add RSS Feed into our Website.
Pre-requisite:
A active blogger account.
To create a blogger account click Blogger
Steps
Step 1:
Log into your Blogger.com account. Click on Dashboard.
Step 2:
Click on the Template.
Click on Add Page Elements.
Select "Feed" Page Element.
This will open up a popup window. Here you need to provide the url for the feed to be retrieved.
Step 3:
To answer step 3.
Click on FeedBurner.
Register for a login.
Login into the FeedBurner account.
Type your Blog URL into the text box "Burn a feed right this instant" and click on next.
You will get a feedburner URL like http://feeds.feedburner.com/username
Copy this URL to Blogger Page Element.
or
Click on MyAccount link on the FeedBurner site.
Click on Publicize tab, Chickletize your web site by clicking on the Friendly Graphic link.
Select the type of picture representation you need.
You will get a Javascript. Copy the Javascript to clip board.
Step 4:
Go to the Blogger.com Add Page Elements.
Add a Html/JavaScript Page Element. And Paste the code from clipboard.
Save Changes.
Preview your site.
See the RSS Feed appear on you site.
If any where, you get stuck; feel free to write a comment with your email, i will get back to you.
Showing posts with label Blogger World. Show all posts
Showing posts with label Blogger World. Show all posts
Thursday, November 15, 2007


Monday, October 22, 2007
How to create a simple Expandable Posts?
Well after few weeks of hard struggle to design a 3-column Blogger template and upgrade my earlier site http://conqueryourmind.blogspot.com, i had discovered a lot of new innovative designs that we can use in our blogger sites. This is one of them.
After reading a lot of articles, i came up with the most simplest way to design a expandable posts.
Expandable Post: is a method by which a entire article can have a preview kind of short paragraph, and a "Read more!" link. Upon clicking the readme link, the entire article is available.
Click the "Read more!" link to read the step by step procedure.
Step 1:
CONDITIONAL CSS
The first step is to put the code for the conditional css. This changes how posts display on different pages. To do this login to Dashboard and click on Layout for your blog. Then click on Edit Html and first backup your template by using the Download Full Template link. Then scroll down till you come to tag and add the following code immediately above it :
Save Template. IMPORTANT NOTE in the layouts template there is a ]]> tag just above the tag. Add the above code so that it lies between these two tags. What we did here was to define a class called "fullpost" that will appear only on post pages (permalinks).
Step 2:
"READ MORE" LINKS
The next step is to add the Read More links which will appear after the paragraph summaries. To do this put a check in the Expand Widgets Template checkbox at the top of the Edit Template text box. This is in the Edit Html subtab of Template tab. Then scroll down in the code till you come to the Blog Posts Widget code where locate this line of code :
Add the code below immediately after the above code :
Read more!
Save Template. This link will only appear on the main page and archive pages, and it will redirect your reader to the post page containing the full text of your post.
IMPORTANT NOTE : Do not use any other code or it will give error.
UPDATE
A Reader wanted to increase the font size of the Read More! link. To do this add this code instead of the one above :
Read more!
Increase or decrease the figure 120 as you want it and then save the template. To make the font bold use this code instead :
Read more!
Save Template. To do both use this code :
Read more!
Save Template.
Step 3:
POST MODIFICATIONS
The last step is to modify the post template so that each post when created will show you where to place your summary paragraph and where to place the rest of the post. To do this go to Settings------>Formatting and scroll down to the end of the page to the box for the Post Template. Copy and Paste the following lines there :
Here is the beginning of my post. And here is the rest of it.
Save Settings. When you click on Create Post and then Edit Html tab of Post Editor you will see the following (Click Image for larger view) :
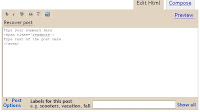
Replace the line "Here is the beginning of my post." (Type your summary here) with your summary paragraph. Then replace the line "And here is the rest of it." (Type rest of the post here.) with the rest of your post. Do not delete the other lines and . Also add your summary paragraph above both the lines and your rest of the post between the lines. Then click Publish to publish post.
ADVANTAGES OF THIS METHOD
The advantages of this method is you get a link to your posts below your summary paragraph which gets an additional link in the search engines indexing. Also you do not have to rely on any external Javascript. The third advantage is that the Read More link opens into a new page leaving your main page still open in viewer's browser.
Simple isnt it. Once you have got it right, please dont forget to write me comments
After reading a lot of articles, i came up with the most simplest way to design a expandable posts.
Expandable Post: is a method by which a entire article can have a preview kind of short paragraph, and a "Read more!" link. Upon clicking the readme link, the entire article is available.
Click the "Read more!" link to read the step by step procedure.
Step 1:
CONDITIONAL CSS
The first step is to put the code for the conditional css. This changes how posts display on different pages. To do this login to Dashboard and click on Layout for your blog. Then click on Edit Html and first backup your template by using the Download Full Template link. Then scroll down till you come to tag and add the following code immediately above it :
Save Template. IMPORTANT NOTE in the layouts template there is a ]]> tag just above the tag. Add the above code so that it lies between these two tags. What we did here was to define a class called "fullpost" that will appear only on post pages (permalinks).
Step 2:
"READ MORE" LINKS
The next step is to add the Read More links which will appear after the paragraph summaries. To do this put a check in the Expand Widgets Template checkbox at the top of the Edit Template text box. This is in the Edit Html subtab of Template tab. Then scroll down in the code till you come to the Blog Posts Widget code where locate this line of code :
Add the code below immediately after the above code :
Read more!
Save Template. This link will only appear on the main page and archive pages, and it will redirect your reader to the post page containing the full text of your post.
IMPORTANT NOTE : Do not use any other code or it will give error.
UPDATE
A Reader wanted to increase the font size of the Read More! link. To do this add this code instead of the one above :
Read more!
Increase or decrease the figure 120 as you want it and then save the template. To make the font bold use this code instead :
Read more!
Save Template. To do both use this code :
Read more!
Save Template.
Step 3:
POST MODIFICATIONS
The last step is to modify the post template so that each post when created will show you where to place your summary paragraph and where to place the rest of the post. To do this go to Settings------>Formatting and scroll down to the end of the page to the box for the Post Template. Copy and Paste the following lines there :
Here is the beginning of my post. And here is the rest of it.
Save Settings. When you click on Create Post and then Edit Html tab of Post Editor you will see the following (Click Image for larger view) :

Replace the line "Here is the beginning of my post." (Type your summary here) with your summary paragraph. Then replace the line "And here is the rest of it." (Type rest of the post here.) with the rest of your post. Do not delete the other lines and . Also add your summary paragraph above both the lines and your rest of the post between the lines. Then click Publish to publish post.
ADVANTAGES OF THIS METHOD
The advantages of this method is you get a link to your posts below your summary paragraph which gets an additional link in the search engines indexing. Also you do not have to rely on any external Javascript. The third advantage is that the Read More link opens into a new page leaving your main page still open in viewer's browser.
Simple isnt it. Once you have got it right, please dont forget to write me comments
Subscribe to:
Posts (Atom)